
VIP member
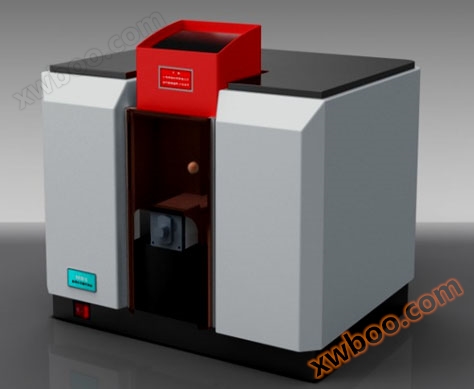
Whole blood five element analyzer
User Manual for Five Element Analyzer 1 Overview 1.1 Application for Determination of Five Elements (Calcium, Copper, Magnesium, Iron, and Zinc) in Hu
Product details
User Manual for Five Element Analyzer

1 Overview
1.1 Purpose
Used for the determination of five elements (calcium, copper, magnesium, iron, zinc) in human whole blood.
1.2 Structure
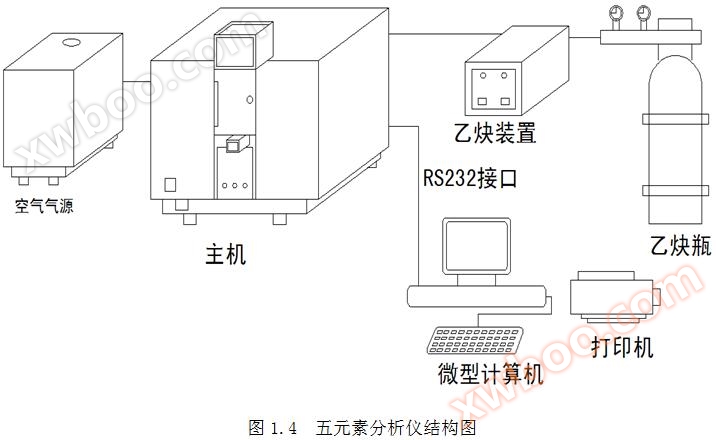
The FEA blood five element analyzer consists of a host, computer system, printer, air source, acetylene * * device, and acetylene cylinder. Refer to Figure 1.2. FEA blood five element analyzer is a precision optical analysis instrument.
1.5 Working principle
The ground state atoms in the flame absorb five elements, and the hollow cathode lamp emits five resonance lines. Through the splitting and focusing effects of the concave grating, the resonance lines are concentrated on the slit on the Roland circle according to the grating equation, and then irradiated onto five phototubes. Set the lamp current and negative high voltage of the photomultiplier tube to achieve a light transmittance of 99.9%. Measure the content of elements based on the absorption of resonance lines by ground state atoms.
C = c×A×A + b×A + a
A -- absorbance;
A. B, c -- constants;
C -- Concentration of the element to be tested;
1.6 Main Features
1.6.2 Save * * time, the five element composite is a self-developed hollow cathode lamp, which can simultaneously measure the content of copper, zinc, calcium, magnesium, and iron within 10 seconds. Accurate and fast.
1.6.3 The use of specialized reagents eliminates the complex pre-processing process of the sample, reduces contamination of the sample and the personnel involved, and ensures the accuracy of the data;
1.6.3 The flow rate of C2H2 gas with a fixed combustion assistance ratio is set to ensure that the combustion assistance ratio does not change every time the analysis and research personnel turn it on;
1.6.4 Fix the flame height position so that each measurement has consistent data;
1.6.5 Unique light path design, using an integrated lamp holder to fix the working position of the lamp, eliminating the need for analysts to adjust the lamp position, making the measurement more stable and accurate;
1.6.6 This instrument is equipped with a general-purpose microcomputer that runs FEA software and can achieve automatic control of the host. It can display various data and analysis curves on the monitor and has the functions of printing, storing, retrieving, and reprocessing analysis results.
1.6 Main technical indicators
1.6.1 * * Type: Type I, Type B;
1.6.2 Working system: intermittent loading, continuous operation;
1.6.3 Input power: 300VA;
1.6.4 Fuse wire model: 3A/250V (Φ 5mm × 20mm);
1.6.5 Number of spectral channels: Five channels;
1.6.6 Monochromator: Concave holographic grating monochromator;
1.6.7 Absorption range: 0-2Abs;
1.6.8 Flame Atomizer: Pre mixed single slit burner;
Measurement method 1.6.9: Abs (absorbance) and concentration. Number reading method: instantaneous value, peak area integral value;
1.6.10 Processing function: automatic zero adjustment, repeated measurement of standard samples, repeated measurement of samples;
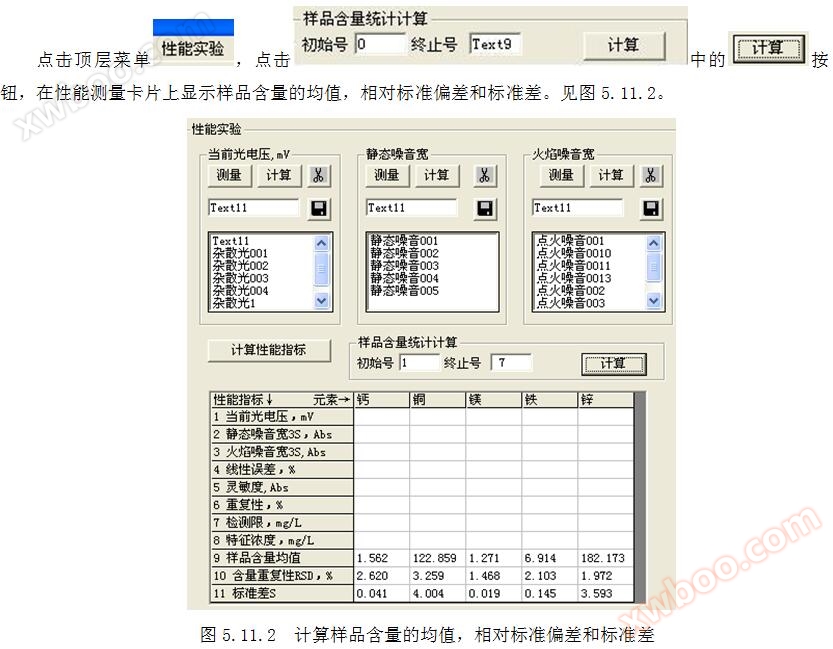
1.6.11 Results statistics function: mean, SD (standard deviation), and RSD (relative standard deviation);
1.6.12 When the air pressure is less than 0.15MPa, acetylene will automatically shut down and * * will automatically shut down;
1.6.13 has automatic setting of negative high voltage, automatic zero calibration control, automatic energy balance, computer display and printing functions;
1.6.14 Synchronous Measurement: Within 10 seconds of a single injection, measure the content of copper, zinc, calcium, magnesium, and iron simultaneously.
1.7 Performance indicators (waiting for new test files to be written)
Elements Calcium Ca Copper Cu Magnesium Mg Iron Fe Zinc Zn
Current photovoltaic voltage%<0.5%<0.5%<0.5%<0.5%<0.5%<0.5%<0.5%
Baseline noise width<± 0.006<± 0.006<± 0.006<± 0.006<± 0.006<± 0.006
Linear error%<6<6<6<6<6<6<6
Sensitivity A>0.1>0.05>0.1>0.1>0.1>0.1
Relative deviation of absorbance%<5<5<5<5<5<5
Detection limit mg/L<0.1<0.1<0.1<0.8<0.1
Characteristic concentration mg/L<0.06<0.06<0.06<0.7<0.06
Installation and acceptance of instruments
2.1 Necessary conditions for instrument operation
2.1.1 Indoor ambient temperature: 5 ℃ to 35 ℃;
2.1.2 The relative humidity in the laboratory shall not exceed 75%;
2.1.3 Vibration and electromagnetic interference that do not affect the use of instruments in the laboratory;
2.1.4 Laboratories should be separated from chemical laboratories to prevent acid, alkali, and other corrosive gases or smoke from corroding the optical and precision mechanical components of instruments.
2.1.5 The laboratory should be kept clean, dry, and dust-free. There are no corrosive gases indoors and good ventilation devices;
2.1.6 The laboratory workbench should be flat and firm, and should not deform after placing the instruments. There is sufficient space around to connect circuits, air circuits, and debugging instruments for easy maintenance.
2.1.7 Power supply: AC voltage 220V ± 22V, frequency 50Hz ± 1Hz. The instrument should have a good connection, generally with a resistance of<0.1 Ω;
2.1.8 Gas source conditions:
Air: oil-free air compressor: 0.23MPa pressure; Nominal volumetric flow rate: 0.3m3/h to 0.9m3/h;
Acetylene: Generally, pure acetylene in steel cylinders with a purity of over 99% should be used. Acetylene cylinders should be placed in a well ventilated area, away from rain and direct sunlight. The ambient temperature should be below 35 ° C, and they should be kept away from distribution boards, high-voltage power sources, wires, and flammable and explosive materials. There should be * * fire prevention signs and fire extinguishers at the placement location. The residual pressure of the gas used shall not be less than 0.4MPa;
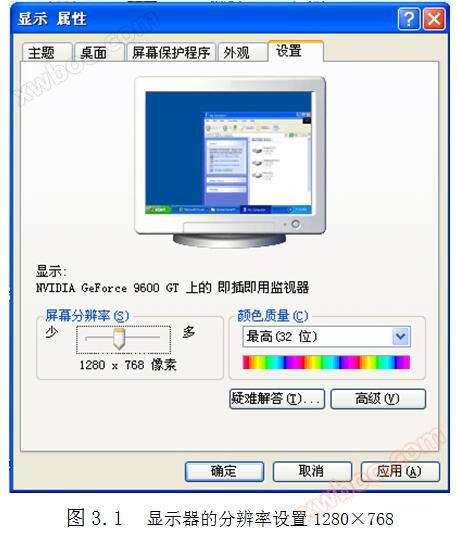
2.1.9 Computer host (optional accessories): CPU 200MHz or above microcomputer system. Display pixel setting: 1280 × 768; And configure a printer compatible with it;
2.1.10 Standard series solutions and standard reagents provided by the manufacturer;
2.1.11 Flame Igniter.
2.2 Instrument installation
The connection between FEA blood five element analyzer and various components should strictly follow the schematic diagram in Figure 1.4. The specific steps are as follows:
2.2.1 Prepare a power strip with three sets of three pin sockets, use a multimeter to check the voltage of the working power supply, and ensure that it meets the usage requirements;
2.2.2 Connect the computer to the FEA five element blood analyzer using a 232 serial port;
2.2.3 Connect the computer and printer and perform a printing test.
2.2.4 Connect the air compressor to the FEA five element blood analyzer using a rubber tube and secure it tightly with a steel sheath. Pay attention to connecting the drainage pipe of the air compressor to the lower indoor water pipe;
2.2.5 Connect the purified acetylene cylinder to the acetylene controller, and then connect the acetylene controller to the FEA five element blood analyzer;
2.2.6 There is a waste nozzle at the lower end of the atomizer, and a waste pipe with a length of about 1.5 meters is connected to the waste nozzle to remove the waste. A circular ring with a diameter of about 15 centimeters is wrapped around the middle of the pipe and fixed. A small amount of water is added to the ring to keep it in place, forming a water seal to prevent acetylene gas from leaking out of the waste pipe and causing backfire. Insert the lower end of the waste liquid tube into a plastic bucket or glass bottle, and do not insert the waste liquid tube below the liquid level or directly into the laboratory's drainage system.
Attention: Before ignition, it is necessary to check the water level in the water seal to ensure that it reaches the marked line.
2.2.7 Turn on the air compressor and adjust it to the working pressure, then open the air intake valve of the FEA five element blood analyzer and check the sealing of the connection point with soapy water;
2.2.8 Open the acetylene cylinder, adjust it to normal working pressure, open the acetylene controller and ignite the acetylene flame. Use soapy water to check the sealing of the external gas connection point, and the instrument will automatically check whether there is any leakage inside the instrument;
2.2.9 After the gas circuit is normal, turn off all components, turn on the computer and FEA five element blood analyzer power, and check if the instrument is functioning properly;
2.3 Instrument acceptance
2.3.1 Product Package Acceptance
Inspect according to the packing list and verify the integrity of each component of the product;
2.3.2 Product Performance Acceptance
Follow the guidance of software installation in Chapter 3 and testing in Chapter 4 for inspection, and meet the requirements of instrument performance indicators specified in 1.7.
3 FEA software
3.1 Resolution setting of monitor
The resolution setting of the monitor is 1280 × 768, as shown in Figure 3.1.
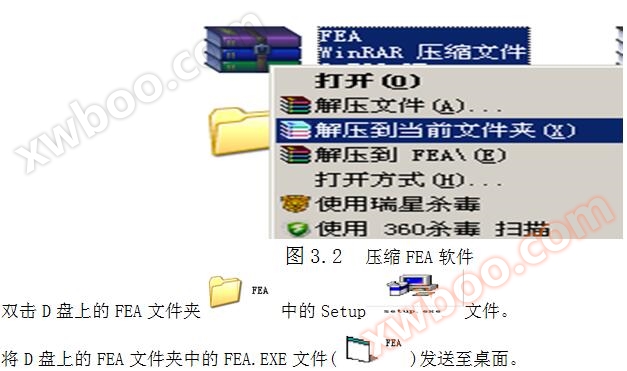
3.2 Software Installation
Under the Windows * operating system, copy the FEA compression software onto the * D drive and extract it to the current folder (X).
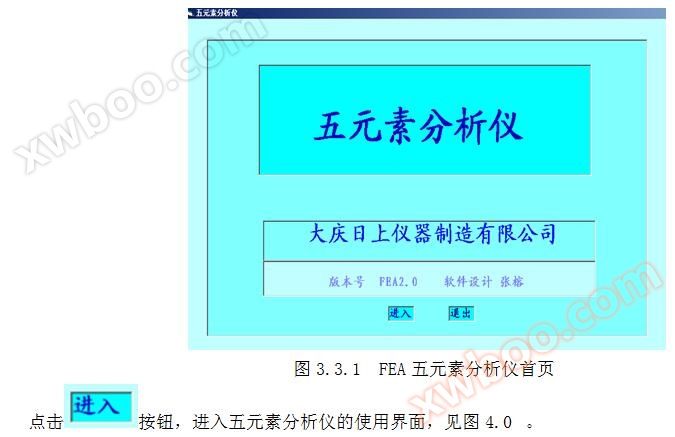
3.3 Start FEA Five Element Analyzer System
Double click the FEA icon on the WINDOWS desktop Immediately enter the homepage of the FEA Five Element Analyzer interface. Refer to Figure 3.3.1. If the software cannot run properly, it can run normally after installing VB6.
Immediately enter the homepage of the FEA Five Element Analyzer interface. Refer to Figure 3.3.1. If the software cannot run properly, it can run normally after installing VB6.
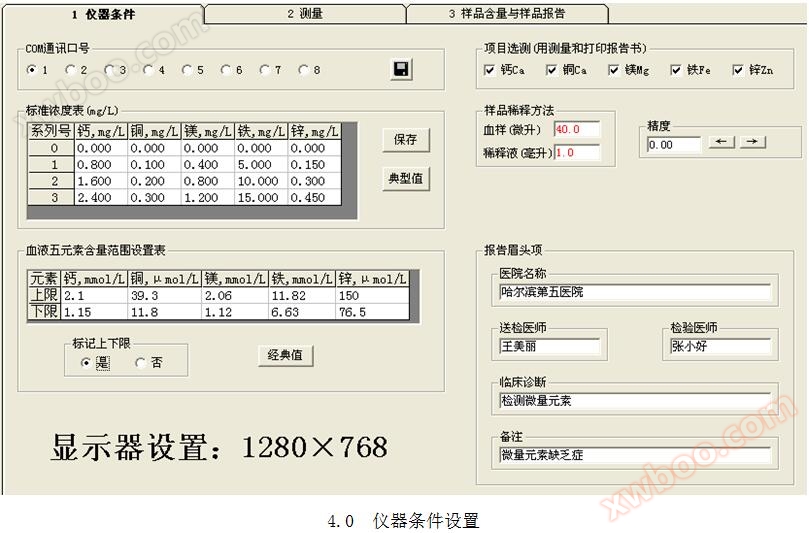
4 Instrument condition settings
Click on the "1 Instrument Conditions" card to enter the instrument settings interface, as shown in Figure 4.0.
4.1 COM Communication Port Settings
Click on the instrument condition card, click on the COM communication port radio button to select the communication port, and then click The button saves the communication slogan, as shown in Figure 4.1.
The button saves the communication slogan, as shown in Figure 4.1.

4.2 Sample dilution method
Add 40 microliters of blood sample to 1.00mL of blood sample diluent. Refer to Figure 4.2.

4.3 Accuracy
Accuracy refers to the precision of measurement results. Refer to Figure 4.2.
4.4 Standard concentration setting
The relationship between serial number and concentration is shown in Figure 4.4. The FEA five element analyzer uses the standard working curve method for quantification.
Add 40 μ L of blood sample to 1000 μ L of diluent. (1+0.040)/0.04=26 times
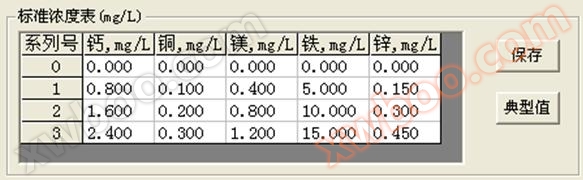
Figure 4.4 Standard concentration setting
4.5 Project selection and testing
The selected element items can display * * results in printed reports and simulated prints. Refer to Figure 4.5. When the calcium spectrum is first inserted into the seam, calcium single element measurement is set up.

4.6 Measurement Range Setting
The units of measurement for elements in blood are shown in Figure 4.6. The measurement results of elements in blood should be within the upper and lower limits.
If the upper and lower limits of the marker are selected as "Yes", the "↓" and "↑" markers will be displayed during measurement.
If you select 'No' for the upper and lower limits of the marker, the '↓' and '↑' markers will not be displayed during measurement, only the measured value will be displayed.

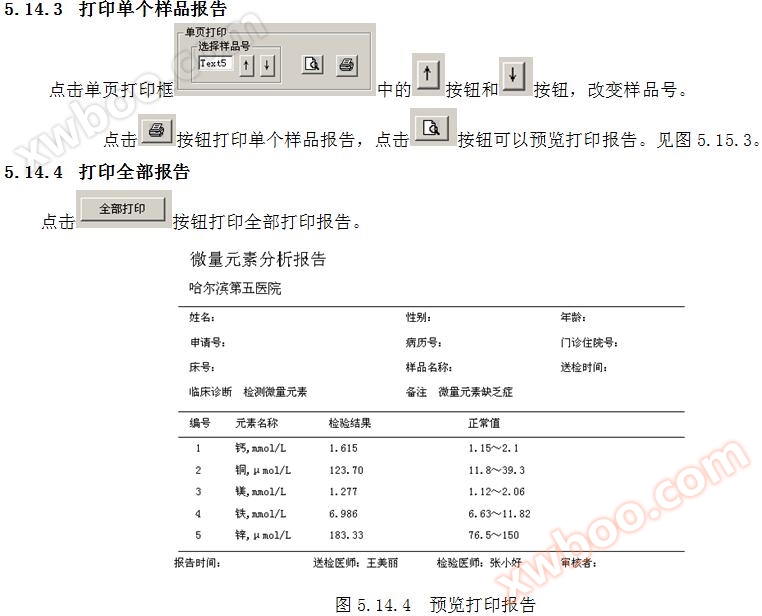
4.7 Report brow
Print the hospital name, sending physician, testing physician, clinical diagnosis, and remarks when printing the report. Refer to Figure 4.7.
Measurement of Five Elements in Blood (Continuous Injection)
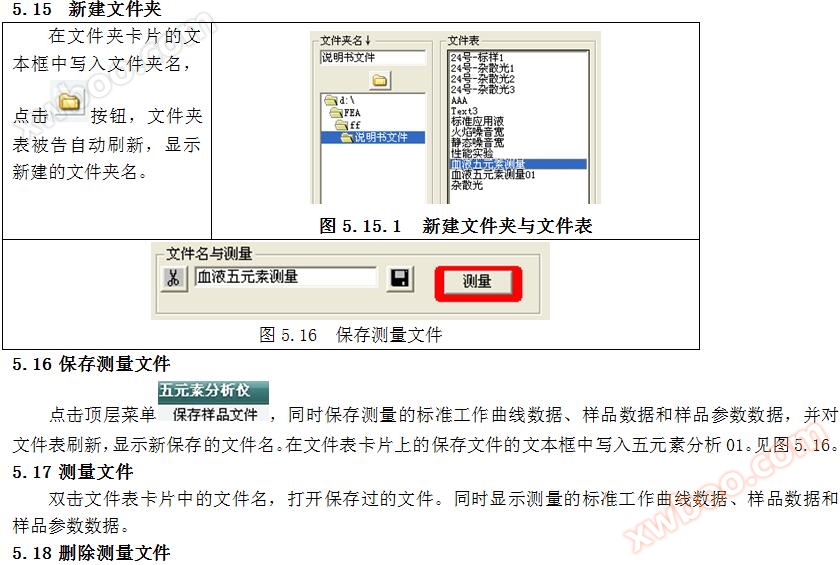
5.1 Enter the measurement interface: see Figure 5.1.

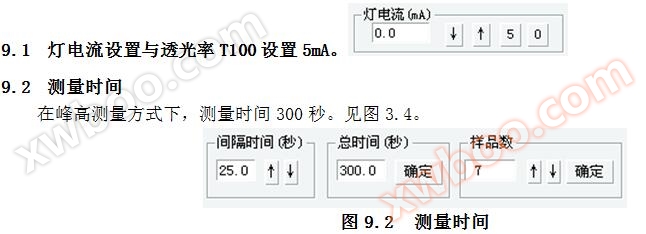
5.2 Lamp current setting and transmittance T100 setting
5.2.1 Lamp current setting: Click Button, set the lamp current to 5mA; Click the ↓ button to reduce the lamp current; Click the ↑ button to reduce the lamp current. Refer to Figure 5.1.
Button, set the lamp current to 5mA; Click the ↓ button to reduce the lamp current; Click the ↑ button to reduce the lamp current. Refer to Figure 5.1.5.2.2 Transmittance T100 setting: Click The button automatically completes the negative high voltage setting required for the transmittance T of 5 photomultiplier tubes to reach 99.9%. If the transmittance cannot reach 99.9%, click the button again to make T reach 99.9%. This process is the process of implementing automatic energy balance on the photoelectric cell.
The button automatically completes the negative high voltage setting required for the transmittance T of 5 photomultiplier tubes to reach 99.9%. If the transmittance cannot reach 99.9%, click the button again to make T reach 99.9%. This process is the process of implementing automatic energy balance on the photoelectric cell.5.3 Measurement total time and measurement sample interval time
Total measurement time=Measurement sample interval time x (1+Number of standard samples+Number of samples)

Figure 5.3 Measurement of Sample Interval Time
5.4 Preparation of Standard Series Solutions: Open the bottle caps of Standard Solution 0, Standard Solution 1, Standard Solution 2, and Standard Solution 3.
5.5 Blood Collection and Preparation of Blood Sample Solution
Collect 40 microliters of uncondensed peripheral blood sample, quickly add it to a centrifuge plastic tube containing 1mL of whole blood pentavalent reagent, mix well and prevent coagulation.
5.6 Ignition
5.6.1 Confirm that the air circuit connection is intact, adjust the flow control valve of the air compressor counterclockwise to * *, turn on the power of the air compressor, and adjust the flow valve clockwise to make the air pressure 0.23Mpa.
5.6.2 Open the valve of the acetylene cylinder, adjust the secondary pressure gauge, and confirm that the acetylene pressure is 0.03Mpa.
5.6.3 When turning on the power of the acetylene * * device, press the [* * button] and ignite the combustion head with the flame igniter.
Adjust the acetylene and air control valves near the combustion head, observe the flame stability, and stop when the color is blue. Measure the suction and spray rate at approximately 6ml/min.
5.6.5 After ignition, the flame must be observed for another 20 seconds to prevent accidental flame extinction due to long acetylene pipelines or unstable pressure gauges. When the flame unexpectedly extinguishes, please immediately turn off the acetylene controller.
5.6.6 In order to use * *, this product uses a separate acetylene controller to control acetylene gas. In case of accidental flameout, the acetylene controller can be directly turned off. If you need to reignite, simply turn on the flame igniter and ignite it again.
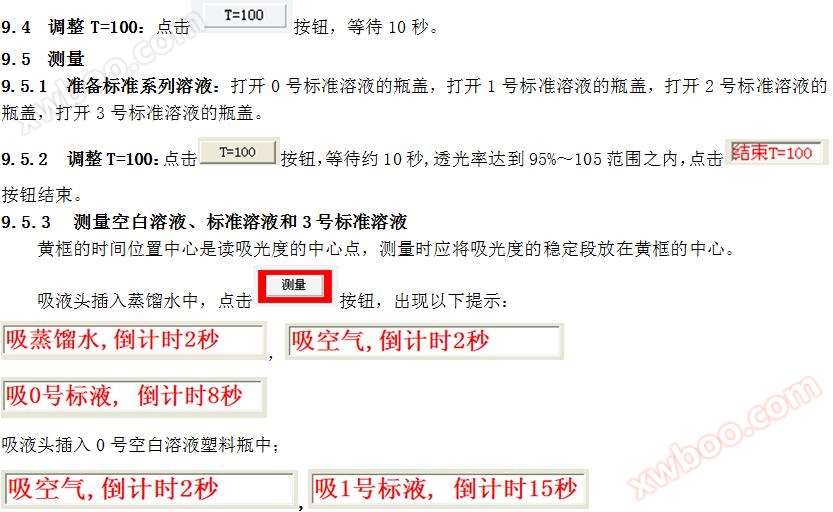
5.7 Adjust T=100
Click the button and wait for about 10 seconds until the transmittance reaches within the range of 95% to 105%. Click The button ends.
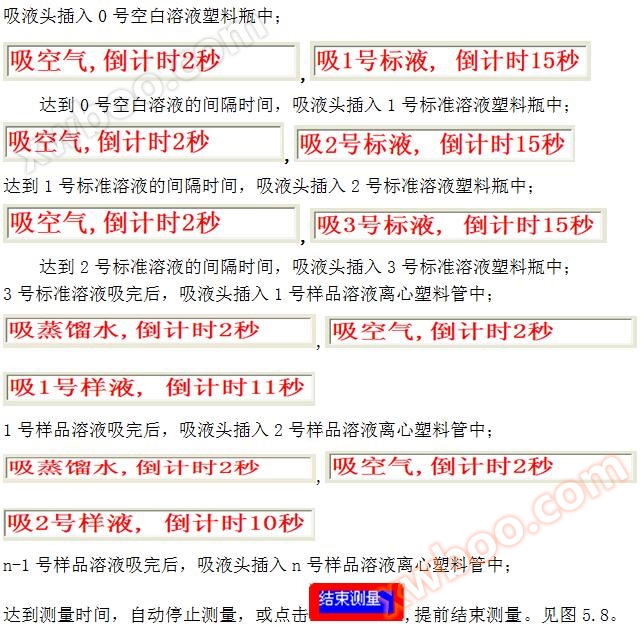
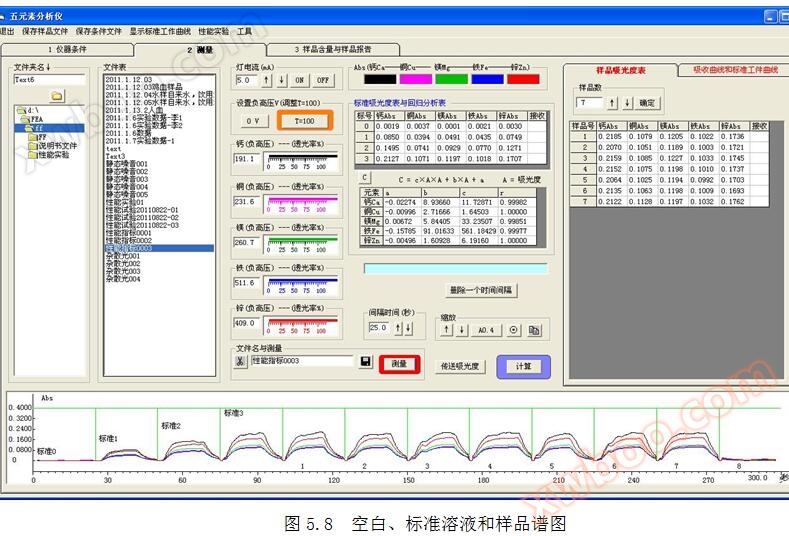
The button ends.5.8 Measurement of * * solutions, standard solutions, and sample solutions
The time position * * in the yellow box is the * * point for reading absorbance, and the stable segment of absorbance should be placed in the * * of the yellow box during measurement.
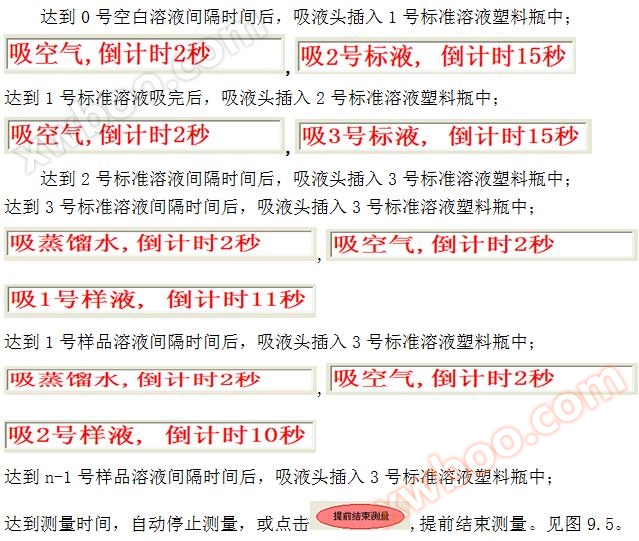
Insert the suction head into distilled water and click The "Measure" button in appears with the following prompt:
The "Measure" button in appears with the following prompt:

5.9 Collecting absorbance of * * solution, standard solution, and sample solution from static spectra
Transfer all standard absorbance: Click the "Transfer Absorbance" button with the mouse to automatically transfer the absorbance * of all * * solutions, standard solutions, and sample solutions to the spectrum table.
5.10 Standard Calculation
Click the "Show Standard Operating Curve" button in the toolbar to display the parameters in the regression equation in the regression analysis calculation table. To view the standard operating curve, click the button in the standard absorbance measurement table. Refer to Figure 5.10.

5.12 Content Unit Conversion Instructions:
1.00mg/L calcium=1/40.08 mmol/L calcium=0.02495 mmol/L calcium=K1
1.00mg/L iron=1/55.847 mmol/L iron=0.017906 mmol/L iron=K2
1.00mg/L copper=1000/63.546 μ mol/L copper=15.7366 μ mol/L copper=K3
1.00mg/L magnesium=1/24.305 mmol/L magnesium=0.041144 mmol/L magnesium=K4
1.00mg/L zinc=1000/65.38 μmol/L zinc=15.295 μmol/L zinc=K5
5.13 Content Calculation Formula
The ion concentration Cx in the blood sample is Ci × Ki × (1.0+0.040)/0.040
Where:
Cx - ion concentration in the blood sample;
Ci - ion concentration in the tested sample solution, mg/L;
1.0- Volume of diluent, mL;
0.04- volume of blood sample, mL。
(1.0+0.040) /0.040 = 26
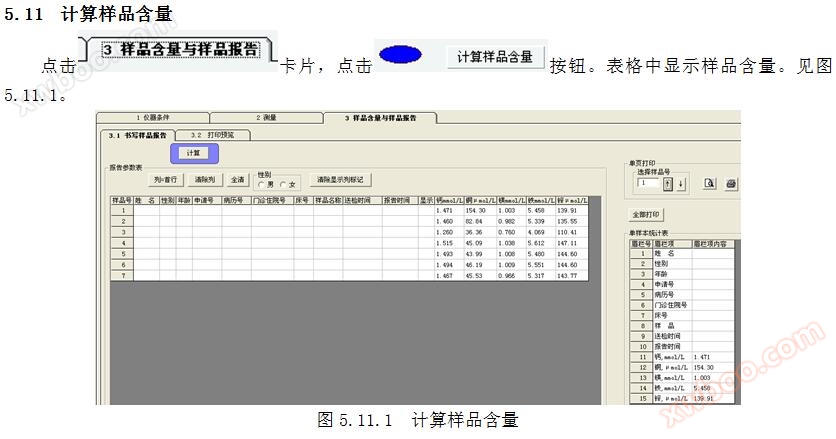
5.14 Sample Report
Click on the 3 sample report cards to print the sample report.
5.14.1 Writing Report Parameters
Write name, gender, age, application number, medical record number, outpatient admission number, bed number, sample name, submission time, and report time in the sample report parameter table. Refer to Figure 6.15.
5.14.2 Display Single Sample Report Parameters
Click on a row cell in the display column to show the parameters of a single sample report, as shown in Figure 6.15.

6 Maintenance and upkeep
6.1 Indoor Cleaning
Maintain the hygiene and environment of the laboratory, regularly clean the laboratory, and avoid mirrors being covered by dust that affects the transmission of light energy. After the experiment, the test equipment should be cleaned up, acidic substances should be kept away from the instrument, and the humidity inside the instrument room should be maintained. To prevent corrosion and mold growth of optical components caused by acidic gases.
6.2 Regular Inspection
6.2.1 Check the waste liquid pipe to ensure that the surface of the waste liquid is not submerged in the outlet of the waste liquid pipe and promptly pour out the waste liquid.
6.2.1 When the liquid accumulation in the waste liquid tube reaches the bottom of the atomization bucket, it will make the measurement extremely unstable, so it is necessary to check whether the waste liquid tube is unobstructed at all times and pour the waste liquid regularly.
6.2.1 Regular inspection of acetylene gas circuit to prevent gas leakage caused by pipeline aging and potential hazards.
6.2.1 Regularly check the gas circuit, and make sure to * * test for leaks after each acetylene cylinder replacement. Use soap water or other liquid that can be used to check for air leakage to test for leaks at all interfaces, observe for the formation of bubbles, and determine if there is any air leakage. Pay attention to regularly checking whether there is any air leakage in the air pipeline. Refer to the acetylene inspection method for inspection methods.
6.3 Light source
When the FEA five element analyzer host is not in use for a long time, please turn on the instrument every two weeks and preheat it online for 1-2 hours. To extend the service life. If the elemental lamp is not used for a long time, it will not be able to be used or even ignited due to air leakage, component deflation, and other reasons. Therefore, element lamps that are not used for a long time should be ignited for 2-3 hours every 3-4 months to extend their service life and ensure their performance.
6.4 Optical System
The optical components of the external light path are often kept clean, usually cleaned at least once a year. If there is dust deposition on the optical components, they can be wiped clean with lens cleaning paper; If there is oil stains on the optical components or splashes of dirt when measuring sample solutions, a pre washed and dried gauze soaked in a mixture of ethanol and ether (1:1) can be used to wipe it, then distilled water can be used to rinse off the soap solution, and then an ear wash ball can be used to blow off the water droplets. During the cleaning process, do not use your hands to rub against hard metal objects or touch mirror surfaces.
6.5 Atomizer System
After each analysis, especially after analyzing samples with high concentrations or strong acids, it is necessary to immediately spray distilled water for several minutes to prevent contamination or corrosion of the atomizer and combustion head. After ignition, the entire gap of the burner should be covered with a uniformly burning blue flame in a strip shape. If there is a gap in the middle of the ribbon flame, which is serrated, it indicates that there is dirt or liquid droplets above the gap of the combustion head. At this time, cleaning is needed. The cleaning method is to connect the air and turn off the acetylene. Then, insert filter paper into the combustion gap and carefully wipe it; If it is not satisfactory, remove the combustion head and brush it with a soft bristled brush; If molten beads have formed, fine metallographic sandpaper or a blade can be used to gently scrape and remove sediment. Attention should be paid not to scratch the gaps. The atomizer should be cleaned regularly to avoid local blockage of the atomizer's capillary tube. Once blockage occurs, it will cause a decrease in the amount of solution and a decrease in absorbance value. If the instrument is not used temporarily, hard paper should be used to cover the burner seam to prevent dust accumulation. The relevant moving parts of the atomization system should be lubricated regularly to ensure flexible lifting. The air compressor must be drained of water and oil regularly, and the water separator should be cleaned regularly.
6.6 Gas Circuit System
It is strictly prohibited to use copper and silver parts in acetylene gas pipelines, and oil must be prohibited. When testing high concentration copper or silver solutions, they should be frequently rinsed with deionized water. Regularly drain the accumulated water from the air compressor's gas water separator to prevent water from entering the auxiliary gas flow meter. After the instrument measurement is completed, the acetylene gas should be turned off first. After the flame on the burner is extinguished, the gas valve should be closed and the air compressor should be turned off.
6.7 Regularly replace the fuse.
If there are any other problems that cannot be solved during the use of the product, please contact the after-sales service department of Daqing Rishang Instrument Manufacturing Co., Ltd. at 0459-8186000.
Attachment 1 Instrument Performance Test (for Production Enterprises)
0 Normal working conditions
The working environment of the instrument should meet the following requirements:
a) The ambient temperature ranges from 15 ℃ to 30 ℃;
b) Relative humidity not exceeding 75%;
c) Vibration and electromagnetic interference that do not affect the use of the instrument;
d) There are no corrosive gases indoors and good ventilation devices;
e) Power supply: voltage 220V ± 22V, frequency 50Hz ± 1Hz.
Measure the current photovoltaic voltage
1.1 Definition of Current Photovoltage: The number and total sum of light when there is no light input. The current photovoltaic voltage affects the linearity and sensitivity of the standard operating curve. The number and total sum of light without input are defined as stray light.
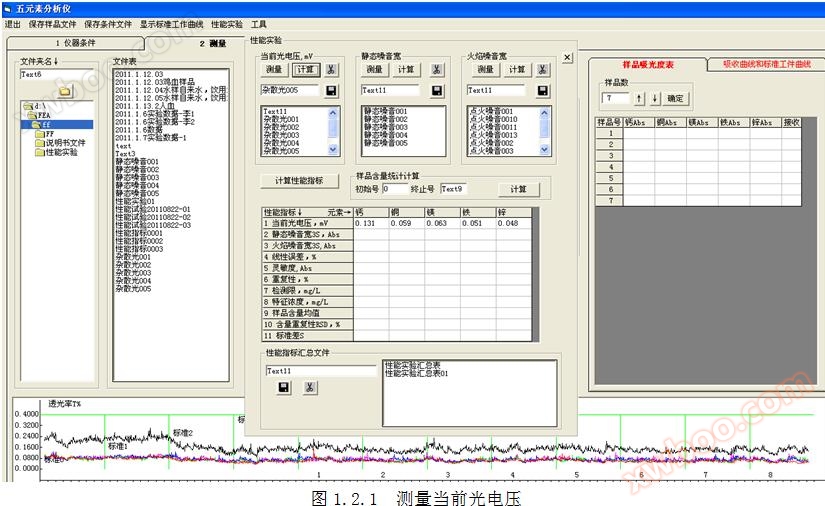
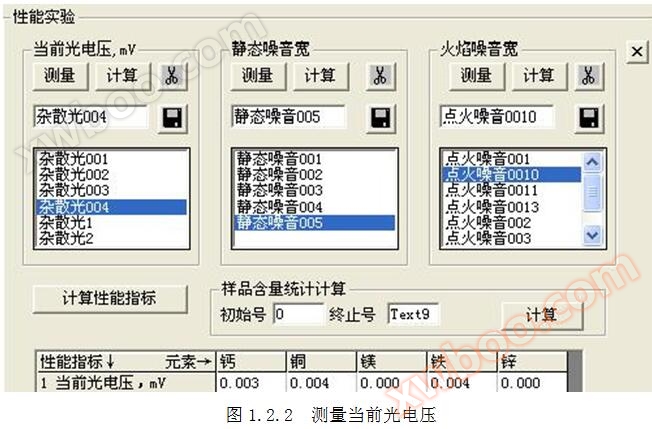
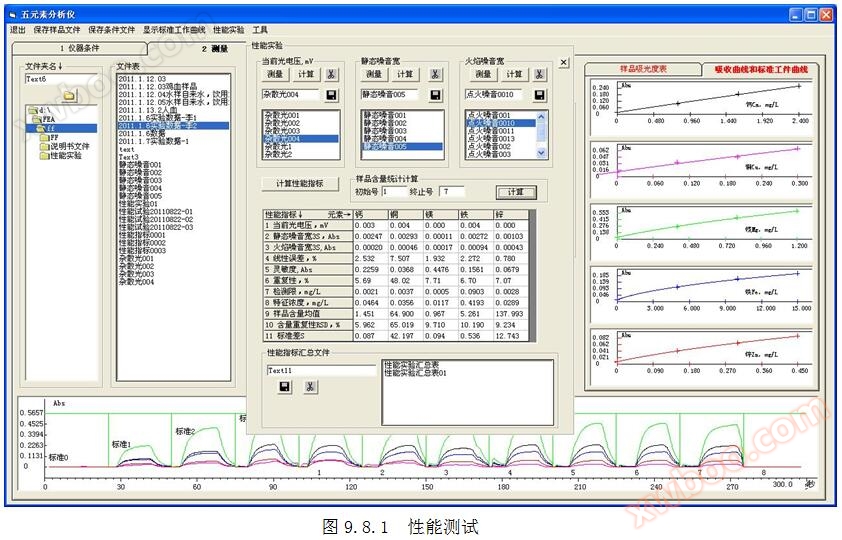
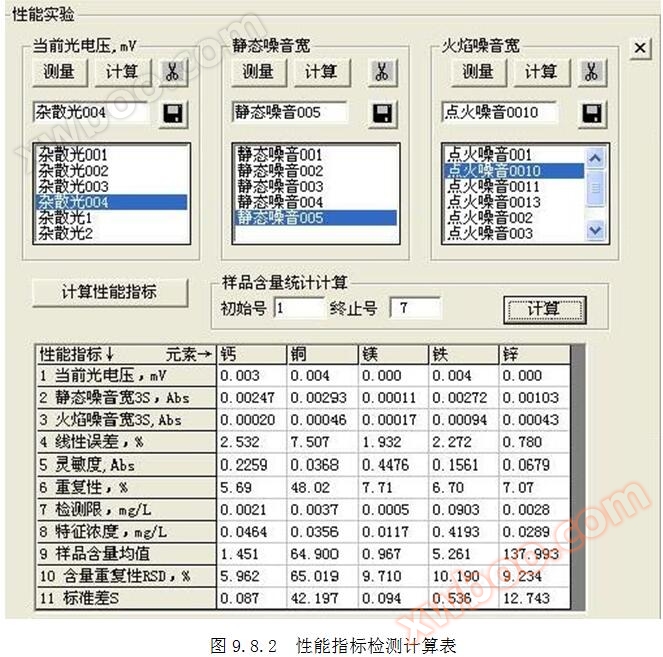
1.2 Current measurement method for photovoltaic voltage: Cover the light inlet, click on the top menu "Performance Measurement", and measure for more than 200 seconds. Click the "" button to start measuring the current photovoltaic voltage. Refer to Figures 1.2.1 and 1.2.2. Click the button in to calculate the current photovoltaic voltage.
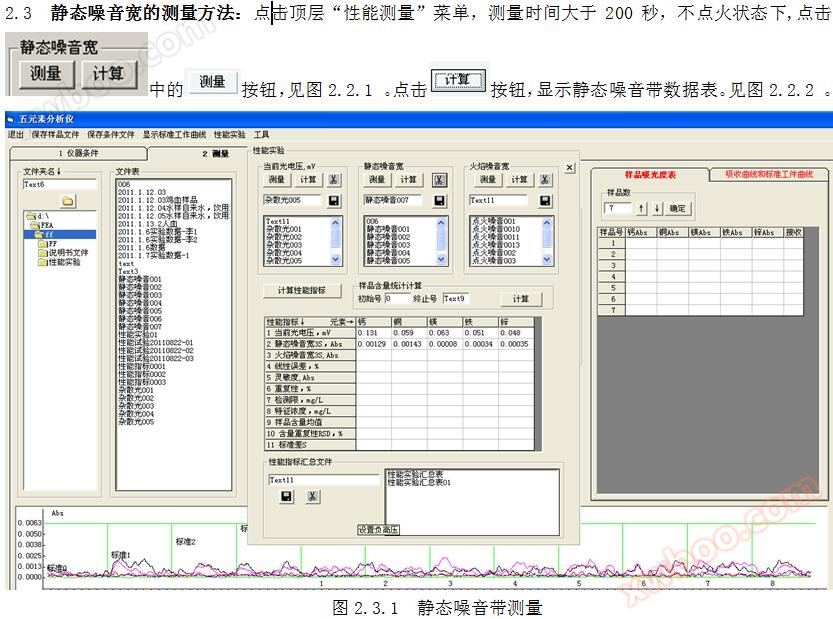
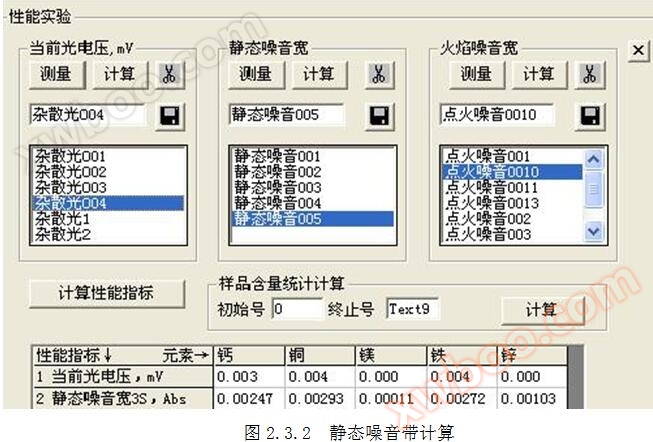
2. Wide static noise
2.1 Definition of static noise width: The static noise width Hb is three times the standard deviation S of * * in the non ignition state.
2.2 Calculation formula for static noise width: Hb=3 × S
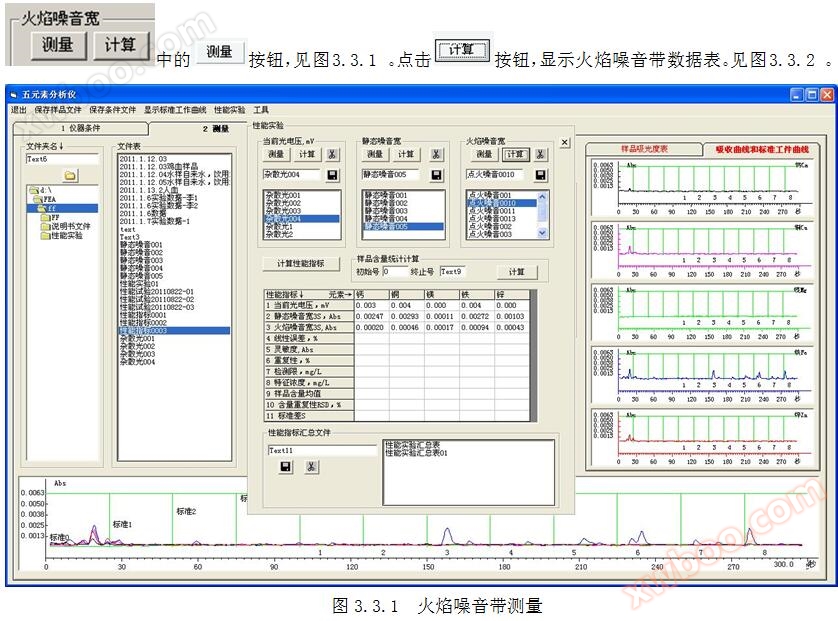
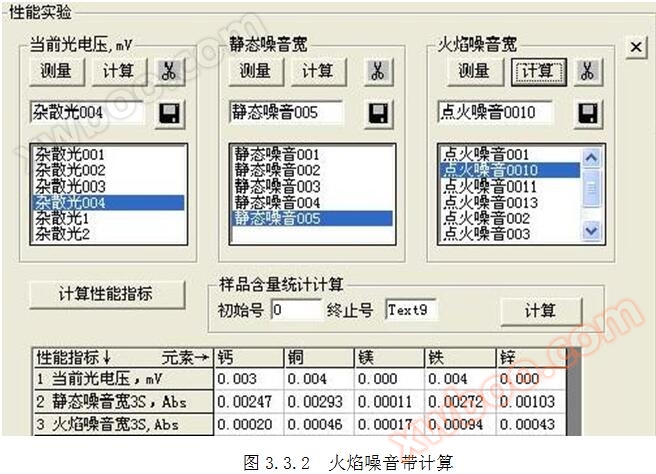
3. Wide flame noise
3.1 Definition of flame noise width: The flame noise width Hb is three times the standard deviation S of * * in the ignition state.
3.2 Calculation formula for flame noise width: Hb=3 × S
3.3 Measurement method for flame noise width: Click on the top "Performance Measurement" menu, measure for more than 200 seconds, and in the ignition state, click
4 Linear Error E
4.1 Definition of Linear Error E: E=[∑ (100 × dC/C)]/3
4.2 Calculation formula: Parabolic regression analysis: dC=| c × A × A+b × A+a-C|
Cs = c×A×A + b×A + a
Where:
c. B, a - constant term.
A - absorbance.
5 Sensitivity
5.1 Definition of sensitivity: It is the average of the absorbance of standard solution No. 3 measured continuously for 7 times.
5.2 Sensitivity calculation formula: Sensitivity=∑ As/7
Where:
As - absorbance of standard solution No. 3.
6 Repeatability
6.1 Definition of repeatability: It is the relative standard deviation (RSD) of the absorbance of standard solution No. 3 measured continuously for 7 times.
6.2 Repetitive Calculation Formula

Where:
A - absorbance of standard solution No. 3.
7 detection limit
7.1 Definition of detection limit DL: It is the concentration of the analyte equivalent to the baseline width Hb.
7.2 Calculation formula for detection limit DL: DL=Hb × Cs/A
Where:
Cs - concentration of standard solution No.3;
A - absorbance of standard solution No. 3;
Hb - Wide noise.
8 characteristic concentrations
The definition of characteristic concentration is the concentration of the analyte corresponding to a transmittance of 99% (absorbance A=0.0043648).
The calculation formula for characteristic concentration: characteristic concentration=0.0043648 × Cs/A
Where:
Cs - concentration of standard solution No.3,
A - absorbance of standard solution No. 3.
Measurement methods for 9 performance indicators
9.3 Ignition
9.3.1 Oil free air compressor: Confirm that the air circuit connection is intact, adjust the flow control valve of the air compressor counterclockwise to * *, turn on the power of the air compressor, and adjust the flow valve clockwise to make the air pressure 0.23Mpa.
9.3.2 Acetylene * * device: Open the valve of the acetylene cylinder, the pressure on the primary pressure gauge should not be lower than 0.4MPa, adjust the secondary pressure gauge, and confirm that the acetylene pressure is 0.03Mpa. Press the [* * button] and ignite the combustion head with the flame igniter at the same time. Adjust the acetylene and air control valves near the combustion head, observe the flame stability, and stop when the color is blue. Measure the suction and spray rate at approximately 6ml/min.
Attention: If the acetylene pressure is not within the working range (0.02Mpa-0.08 Mpa), the acetylene * * device will automatically shut off the gas source, the working indicator light will flash, the alarm will sound, and the * * indicator light will be on. Adjust the acetylene gas source to 0.03Mpa, press the [* * button] and ignite the combustion head with the flame igniter.


Attachment 2 Reagent Preparation
1. Prepare standard reserve solution (prepared in a fume hood)
1.1 2400 mg/L Calcium Standard Stock Solution: Weigh 5.9934g of the reference substance calcium carbonate [CaCO3] dried at 105-110 degrees for 3 hours, and slowly add 20mL of hydrochloric acid and 200mL of water to a 1000mL volumetric flask. Heat and dissolve in a water bath to make up to volume.
1.2 300mg/L copper standard reserve solution: Weigh 0.3000g of high-purity copper [Cu] and add it to a 50mL beaker. Add 10mL of pure water and slowly add 10mL of nitric acid. On an electric furnace, let the flame simmer slightly until colorless and transparent. Add 20mL of water, remove, let cool, transfer to a 1000mL volumetric flask, and make up to volume.
1.3 1200 mg/L Magnesium Standard Stock Solution: Weigh 1.2000g of high-purity magnesium [Mg] and add it to a 50mL beaker. Add 10mL of pure water and slowly add 10mL of hydrochloric acid. On an electric furnace, let the heat simmer slightly until colorless and transparent. Add 30mL of water, remove, let cool, transfer to a 1000mL volumetric flask, and make up to volume.
1.4 15000mg/L iron standard reserve solution: Weigh 1.5000g of high-purity iron [Fe] and add it to a 100mL beaker. Add 10mL of pure water, slowly add 10mL of nitric acid, and simmer slightly on an electric furnace. Slowly add 10mL of hydrochloric acid as a solubilizer, which is colorless and transparent. Add 50mL of water, remove it, let it cool, transfer it into a 100mL volumetric flask, and add 600mL of pure water.
1.5 450mg/L Zinc Standard Stock Solution: Weigh 0.4500g of high-purity zinc [Zn] and add it to a 50mL beaker. Add 10mL of pure water, slowly add 10mL of hydrochloric acid, and simmer on an electric furnace until slightly boiling. The solution is colorless and transparent. Add 100mL of water, remove, let cool, transfer to a 1000mL volumetric flask, and make up to volume.
2 Five element standard reserve solution (48mg/L calcium Ca, 6.00mg/L copper Cu, 24mg/L magnesium Mg, 300mg/L iron Fe, 9.00mg/L zinc Zn): Add 2400mg/L calcium standard reserve solution, 300mg/L copper standard reserve solution, 1200mg/L magnesium standard reserve solution, 10.00mL, 15000mg/L iron standard reserve solution, 450mg/L zinc standard reserve solution, and 10.00mL to a 500mL volumetric flask. Make up to volume.
3 Standard Series Solutions
3.0 No.0 * * solution (whole blood five element * * reagent): Take 5.00mL hydrochloric acid and add it to a 1000mL volumetric flask to make up to volume. Packaged in 50mL plastic bottles. Packaged in 1.00mL plastic centrifuge tubes, with 1.000mL per bottle. 100 tubes per box. Whole blood diluted solution.
3.1 No.1 standard solution (0.800mg/L calcium Ca, 0.100mg/L copper Cu, 0.40mg/L magnesium Mg, 5.00mg/L iron Fe, 0.150mg/L zinc Zn): Take 25.00mL of the five element standard reserve solution and add it to a 2000mL volumetric flask. Add 10.0mL of hydrochloric acid and make up to volume. Packaged in 50mL plastic bottles, with each bottle containing no less than 50mL.
3.2 Standard solution No. 2 (1.60mg/L calcium Ca, 0.200mg/L copper Cu, 0.80mg/L magnesium Mg, 10.00mg/L iron Fe, 0.30mg/L zinc Zn): Take 25.00mL of the five element standard reserve solution and add it to a 1000mL volumetric flask. Add 5.0mL hydrochloric acid and make up to volume. Packaged in 50mL plastic bottles, with each bottle containing no less than 50mL.
3.3 Standard solution No. 3 (2.40mg/L calcium Ca, 0.300mg/L copper Cu, 1.20mg/L magnesium Mg, 15.00mg/L iron Fe, 0.450mg/L zinc Zn): Take 25.00mL of the five element standard reserve solution, add it to a 500mL volumetric flask, add 2.50mL hydrochloric acid, and make up to volume. Packaged in 50mL plastic bottles, with each bottle containing no less than 50mL.
4 standard solutions (for production enterprises)
4.1 240mg/L calcium standard solution: Take 10.00mL of 2400 mg/L calcium standard reserve solution and add it to a 100mL volumetric flask to make up to volume.
4.2 30mg/L copper standard solution: Take 10.00mL of 300mg/L copper standard reserve solution and add it to a 100mL volumetric flask to make up to volume.
4.3 120mg/L magnesium standard solution: Take 10.00mL of 1200 mg/L magnesium standard reserve solution and add it to a 100mL volumetric flask to make up to volume.
4.4 1500mg/L iron standard solution: Take 10.00mL of 15000 mg/L iron standard reserve solution and add it to a 100mL volumetric flask to make up to volume.
4.5 45mg/L Zinc Standard Solution: Take 10.00mL of 450mg/L Zinc Standard Reserve Solution and add it to a 100mL volumetric flask to make up to volume.
Preparation method for 5 standard application liquids (for production enterprises) 1:
5.1 2.40mg/L Calcium Standard Application Solution: Take 10.00mL of 240mg/L calcium standard solution and add it to a 1000mL volumetric flask. Add 5.00mL hydrochloric acid and make up to volume.
5.2 0.300mg/L copper standard application solution: Take 10.00mL of 30mg/L copper standard solution and add it to a 1000mL volumetric flask. Add 5.00mL hydrochloric acid and make up to volume.
5.3 1.20mg/L Magnesium Standard Application Solution: Take 10.00mL of 120mg/L magnesium standard solution and add it to a 1000mL volumetric flask. Add 5.00mL hydrochloric acid and make up to volume.
5.4 15.00mg/L iron standard application solution: Take 10.00mL of 1500mg/L iron standard solution and add it to a 1000mL volumetric flask. Add 5.00mL hydrochloric acid and make up to volume.
5.5 0.450mg/L Zinc Standard Application Solution: Take 10.00mL of 45mg/L zinc standard solution and add it to a 1000mL volumetric flask. Add 5.00mL hydrochloric acid and make up to volume.
5 Standard Application Liquid (for Production Enterprises) Preparation Method 2:
5.1 2.40mg/L Calcium Standard Application Solution: Take 1.00mL of 2400mg/L calcium standard solution and add it to a 1000mL volumetric flask. Add 5.00mL hydrochloric acid and make up to volume.
5.2 0.300mg/L copper standard application solution: Take 1.00mL of 300mg/L copper standard solution and add it to a 1000mL volumetric flask. Add 5.00mL hydrochloric acid and make up to volume.
5.3 1.20mg/L Magnesium Standard Application Solution: Take 1.00mL of 120mg/L magnesium standard solution and add it to a 1000mL volumetric flask. Add 5.00mL hydrochloric acid and make up to volume.
5.4 15.00mg/L iron standard application solution: Take 1.00mL of 1500mg/L iron standard solution and add it to a 1000mL volumetric flask. Add 5.00mL hydrochloric acid and make up to volume.
5.5 0.450mg/L Zinc Standard Application Solution: Take 1.00mL of 45mg/L zinc standard solution and add it to a 1000mL volumetric flask. Add 5.00mL hydrochloric acid and make up to volume.
Attachment 3 Simple Preparation of Five Element Standard Reserve Solution
(Prepared in a fume hood)
Firstly, the application solution for preparing reagents is used to determine that there is no spectral interference in calcium carbonate [CaCO3], high-purity copper [Cu], high-purity magnesium [Mg], high-purity iron [Fe], and high-purity zinc [Zn]. The square root is used to prepare the original five element standard reserve solution.
6 Original Five Element Standard Reserve Solution (2400 mg/L Calcium -300 mg/L Copper -1200 mg/L Magnesium -15000 mg/L Iron -450 mg/L Zinc)
Weigh 5.9934g of the reference substance calcium carbonate [CaCO3] dried at 105-110 degrees for 3 hours and add it to a 1000mL volumetric flask. Add 0.3000g of high-purity copper [Cu], 1.2000g of high-purity magnesium [Mg], 15.000g of high-purity iron [Fe], and 0.4500g of high-purity zinc [Zn]. Add 20mL of water, slowly drip 20mL of hydrochloric acid, slowly drip 20mL of nitric acid, and let it stand for 4 hours. If there are insoluble solids, drip nitric acid, but no solids. Place the volumetric flask in a boiling water bath for 1 hour, shake for 1 minute, add approximately 800mL of water, cool, and make up to volume. 10.00mL of this liquid is packaged in one ampoule and stored.
2 Five element standard reserve solution (48mg/L calcium Ca, 6.00mg/L copper Cu, 24mg/L magnesium Mg, 300mg/L iron Fe, 9.00mg/L zinc Zn): Take 10.00mL of the original five element standard reserve solution and add it to a 500mL volumetric flask to make up to volume.
Attachment 7: Prepare glassware for Attachment 2 and Attachment 3 (dedicated for each bottle)
7.1 Beakers and pipettes
|
serial number |
Product Name |
quantity |
serial number |
Product Name |
quantity |
serial number |
Product Name |
quantity |
|
1 |
50mL beaker |
4 |
8 |
80 × 80 sulfuric acid paper |
100 |
15 |
transparent tape |
1 roll |
|
2 |
100mL beaker |
1 |
9 |
Reagent rack |
1 piece |
16 |
bottle washing |
1 piece |
|
3 |
10mL pipette |
10 |
10 |
500W adjustable electric furnace |
1 piece |
17 |
Suck the ball |
1 piece |
|
4 |
25mL pipette |
1 |
11 |
200 long, 10 diameter glass rod |
1 piece |
18 |
label paper |
3 sheets |
|
5 |
10mL straw |
10 |
12 |
10L lower mouth bottle |
1 piece |
19 |
Waste liquid bottle |
1 piece |
|
6 |
50mL plastic bottle |
20 of them |
13 |
Deionized water (20L plastic bucket) |
20L |
20 |
Rubber gloves |
1 payment |
|
7 |
small scissors |
1 piece |
14 |
filter paper |
1 box |
21 |
analytical balance |
1 piece |
7.2 20 volumetric flasks and labels
|
Product Name |
quantity |
label |
|
|
1000mL volumetric flask
|
13
|
1.1 2400 mg/L Calcium Standard Reserve Solution |
6 Original Five Element Standard Reserve Solution
2400 mg/L calcium
300mg/L copper
1200 mg/L 镁
15000mg/L iron
450mg/L zinc)
|
|
1.2 300mg/L copper standard reserve solution |
|||
|
1.3 1200 mg/L magnesium standard stock solution |
|||
|
1.5 450mg/L Zinc Standard Reserve Solution |
|||
|
Prepare five element standard reserve solution |
|||
|
Solution No. 0 * * |
|||
|
Standard solution No.2 |
|
||
|
5.1 2.40mg/L Calcium Standard Application Solution |
|
||
|
5.2 0.300mg/L Copper Standard Application Solution |
|
||
|
5.3 1.20mg/L Magnesium Standard Application Solution |
|
||
|
5.4 15.00mg/L Iron Standard Application Solution |
|
||
|
5.5 0.450mg/L Zinc Standard Application Solution |
|
||
|
500mL volumetric flask |
1 |
Standard solution No. 3 |
|
|
2000mL volumetric flask |
1 |
Standard solution No.1 |
|
|
100mL volumetric flask
|
6
|
1.4 15000mg/L iron standard reserve solution |
|
|
4.1 240mg/L Calcium Standard Solution |
|
||
|
4.2 30mg/L copper standard solution |
|
||
|
4.3 120mg/L magnesium standard solution |
|
||
|
4.4 1500mg/L iron standard solution |
|
||
|
4.5 45mg/L Zinc Standard Solution |
|
1.7 Five Element Spectral Data
Table 1.8.1 Five Element Spectral Data
|
element |
Calcium Ca |
Copper Cu |
Magnesium Mg |
Iron Fe |
Zinc Zn |
|
Spectral nm |
422.67 |
324.75 |
285.21 |
252.3 sensitive lines |
213.86 |
|
atomic weight |
40.08 |
63.546 |
24.305 |
55.847 |
65.38 |
|
Benchmark object |
calcium carbonate |
High-purity copper |
magnesium oxide |
Ammonium ferrous sulfate |
High purity zinc [Zn] |
|
molecular formula |
CaCO3 |
[Cu] |
MgO |
[FeSO4·(NH4)2SO4·6H2O] |
|
|
Reference molecular weight |
100.09 |
63.546 |
40.304 |
392.1308 |
65.38 |
|
Slit width nm |
30 |
200 |
200 |
200 |
200 |
1.9 Grating data
Roland circle diameter=224.000mm, number of lines/mm=1200, incident angle=0, spectral data shown in Table 1.9. Spectral localization is shown in Figure 1.9.
Table 1.9 Spectral Data Table


Online inquiry
-
Contacts
-
Company
-
Telephone
-
Email
-
WeChat
-
Verification Code
-
Message Content
-