
VIP member
Video positioning safety helmet
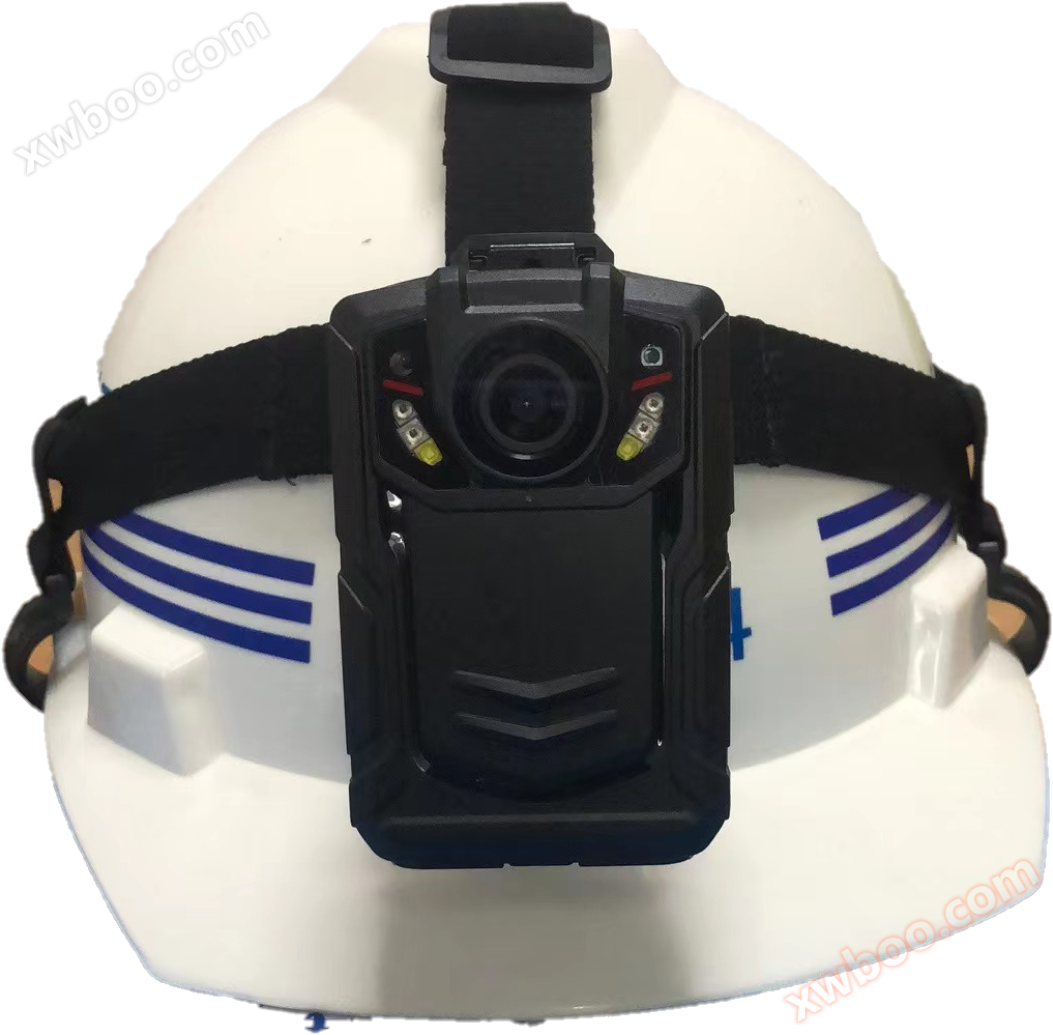
KPV400 Video Safety Helmet User Manual Product Introduction Video safety helmet is an information terminal with audio and video recording function tha
Product details
KPV400Video safety helmetInstructions for Usebook
Product Introduction
A video safety helmet is an information terminal with audio and video recording function that staff wear with them. The device supports recording, recording, snapshot, 3G/4G network transmission (only applicable to products with 3G/4G functions), GPS positioning and other functions. The device is easy to operate, with a built-in LCD display and operation buttons. It is lightweight, small in size, and convenient to carry. It is mainly used for construction site inspections, traffic police law enforcement, fire inspections, urban management law enforcement, tobacco law enforcement, and other occasions that require recording the inspection process.
LordCharacteristics required
The device has a compact structure, reasonable weight, and is easy to carry, fully meeting the needs of single person mobility inspection and evidence collection.
Built in 3G/4G transmission module, capable of remote video monitoring, audio monitoring, and GPS remote positioning. (Only applicable to products with 3G/4G functionality)
Built in high-sensitivity GPS module, combined with GPS positioning, can record the specific location of events at any time, ensuring the integrity and availability of evidence. And it can remotely locate the device's location in real-time through 3G/4G.
The equipment is based on a three proof design and has good waterproof, dustproof, and earthquake resistant capabilities.
The device is powered by lithium batteries, with a long standby time and a running time of no less than 12 hours (2 batteries). Replacing the battery during video recording will not result in a power outage
Equipped with 64GB built-in storage.
Built in 400W pixel camera, supports recording at 1080p and other resolutions. Photography supports pixels such as 4000w, 3200w, 200w, etc.
Equipped with night vision function, the outline of the human body can be clearly seen within 10 meters in pitch black environment.
Dual filter switch, no color cast during the day, clearer at night.
The file names of video files contain information such as date, time, and recording type, which facilitates data archiving and retrieval.
You can browse, retrieve, and replay the stored video, audio, photos, and other information on this device on-site.
Support button one click alarm, in which case the device will generate a manual alarm and directly upload it to the platform.
Encrypt video files to ensure data security.
The device can display the video helmet number, user ID, time and date by default.
The device can display information such as battery level, charging status, system time, and storage capacity; There are obvious light indicators for power on, recording, and video recording status. The standby status indicator is green, and the recording status indicator isorangeThe recording status indicator is red.
The equipment is equipped with abnormal alarms, including battery undervoltage alarm, full storage alarm, etc.
Log function: The software can query device log records, power on/off, audio and video recording, photography, GPS positioning and other logs.
Button Instructions
Button name |
icon |
method |
function |
power button |
|
short press |
Turn on the device in any state during startup/Screen saver function; Short press while in shutdown mode1Start up in seconds. |
long press |
Long press and hold at any startup state3It can shut down in seconds. |
||
Intercom button |
PTT |
long press |
Activate intercom. |
|
record button |
|
short press |
In the power on state, short press to record the video, and short press again to stop shooting and automatically save it; Short press to turn on the device while it is turned off. |
long press |
Long press and hold at any startup state3It can generate a manual alarm and start video recording in seconds, and can be done through3G/4GReport online to the platform. |
||
|
shutter button |
|
short press |
In standby mode, press to take photos; Press during the recording process to capture and save photos. |
long press |
Long press and hold at any startup state3Can be activated in seconds/Turn off the white light; Press and hold the power button while the device is turned off to automatically record the video. |
||
record button |
|
short press |
Recording can be done in standby mode, pressing again will stop recording and automatically save. |
|
laser infrared |
|
short press |
In any state of startup, short press to turn on/Turn off laser positioning shooting to ensure that the image is not biased. |
long press |
Press and hold in any power on state3Switch to night infrared mode in seconds for video or photo shooting. |
||
Fn/SOS |
|
short press |
Used in combination with other functional buttons. |
SIM |
SIM |
socket |
insertSIMMobile data card for real-time transmission function. |
USB |
USB |
connect |
Data transmission interface, charging interface, external camera, walkie talkie, etc. |
Menu key/confirm button |
|
short press |
Short press this button in standby mode to enter menu settings; Short press in the setting state to perform function settings. |
long press |
Long press to switch recording resolution with one click. |
||
Up key |
|
short press |
In the menu settings or file selection state, it is the flip up function; Reduce the image in wide-angle mode(Zoom out) |
Down arrow key |
short press |
In the menu settings or file selection state, it is the downward flipping function; Enlarge the image in wide-angle mode(Zoom in) |
|
return/Local playback |
short press |
Short press to return to the previous level in menu settings or file selection mode; In standby mode, short press to enter the local playback menu and select to play back videos, photos, and audio files. |
Description of work indicator light status
indicator light |
Indicator light status |
Status description |
indicator light1 |
blue |
charge |
indicator light2 |
green |
idle |
red |
video recording |
|
orange |
recording |
Basic Operations
1Open it/Shut down
short press Power button1In seconds, the machine will vibrate for a long time with a prompt sound, and the machine will enter standby mode when turned on. Press and hold the "power button" in any state3Second, the machine will briefly vibrate before shutting down; In the power on state, short press the "power button" to turn on/Turn off the screen saver.
2Video recording
After turning on, the machine directly enters standby preview mode. Short press the "recording button" to record, the machine will briefly vibrate and accompanied by a prompt sound, and the top indicator light will be on2Long bright red, in recording mode, press the "recording button" again, the machine will briefly vibrate with a prompt sound, end and automatically save the recording file. Long press and hold at any power on state3Instant alarm And start automatically recording the video and the video file.
In the shutdown state, short press the "recording button" to turn on the device, and long press the "recording button" to turn on the device and record the video.
When shooting in low light conditions at night, you need to press the "infrared button". At this time, the infrared light will turn on to enter the night shooting mode, and the videos and captured photos taken at night will be black and white.
After setting the video encryption function, encrypted videos can be played back locallyPCEnd playback requires a dedicated player to enter a password in order to play encrypted recordings.
3Recording
After turning on, the machine directly enters standby preview mode. Press the "recording button" to start recording, and the machine will briefly vibrate with a prompt sound. The top indicator light will also be on2Always bright orange, with a recording status image displayed on the machine screen. Press the "recording button" again while recording, and the machine will briefly vibrate with a prompt sound before ending and automatically saving the recording file.
4Take photos
After turning on, the machine directly enters standby preview mode, press the "photo button" to take a photo, and the top indicator light is on2Bright red, the machine briefly vibrates and accompanied by a photo prompt sound, and the screen displays the words "Photo Processing ····". After the words disappear, the photo is completed and the captured image is automatically saved. When shooting under low light conditions at night, it is necessary to turn on or automatically turn on the machine's fill light or infrared light for shooting.
5Infrared camera function
Press and hold the "infrared light button" in any state during startup to manually turn it on/CloseInfrared light, usually in low light conditions in the external environment, the image becomes an infrared cameraIn automatic mode, the color restoration mode will decrease and turn black and whiteColor, this is a normal phenomenon.
6Replay
Short press the "back" button to enter the playback menu, press the "up and down" buttons to select the playback video, photo, and recording folders, and press the "confirm" button to open the corresponding directory folder.
6.1 video replay
The video directory is divided into multiple time periodsFolder, press the 'confirm' button to openA folder containing this timeThe video file captured by the segment, press' OK 'Key recognition "plays videos and records filesThe format isavi.
6.2 quick view
When the photo directory is divided into multiple sectionsInterval folder, press' Confirm 'Key "to open a folder,It was filmed during this time period insideImage file, press the 'confirm' buttonView photos, the photo file format isjpg.
6.3 Recording playback
The recording directory is divided into multiple timesSegment folder, press the 'confirm' buttonOpen a folder, inside isThe audio files recorded during this time period,Press the 'confirm' button to replay the recording,The recording file format iswav.
7Menu settings
Note: After booting up, in standby mode, press the "menu button" to enter the parameter settings interface, select the parameter option that needs to be modified, press the "confirm button" to enter the option, press the "up" and "down" buttons to select the appropriate parameter, press the "confirm" button to complete the parameter modification after selection, and press the "up" and "down" buttons to modify other options. Press the 'back' button to return to standby preview mode.
7.1 video resolution
Video resolution suitable for this deviceTFCard storage, mainly for high-definition video recording at the front end of the device, default is1080P(1920*1080).
7.2 video frame rate
The default video frame rate is30, from5~30Frame selection is available.
7.3 video quality
The default video quality is high, with options including ultra-high, high, medium, and low
Four levels to choose from.
video quality |
ultra-high |
tall |
Chinese |
low |
bitrate |
8M |
6M |
4M |
3M |
7.4 Live resolution
The live streaming resolution is used for remote transmission of devices and defaults to720P(1280*720). in addition1080P(1920*1080)andVGA(640*360)Available for selection.
7.5 Live streaming frame rate
The default live streaming frame rate is25, from5~30Frame selection is available.
7.6 Live streaming quality
The default live streaming quality is medium, with four levels to choose from: ultra-high, high, medium, and low.
ultra-high |
tall |
Chinese |
low |
|
1080P |
4 M |
3 M |
2 M |
1 M |
720P |
3 M |
2M |
1.5M |
800K |
VGA |
1.5 M |
1M |
700K |
350K |
7.7 Live streaming stream mode
The default live streaming stream mode is smooth priority, with two modes: smooth priority and image quality priority.
7.8 Photo size
The default photo size is1920*1080have1920*1072~8640*4752There are six image attributes to choose from.
7.9 Wide angle mode
There are two options for wide-angle mode: "standard" and "wide-angle". In standard mode, distortion correction is added to make the image more realistic and accurate. In wide-angle mode, the lens angle is larger and the lens coverage is wider.
7.10 USBworking mode
USBThe default working mode is automatic, divided into three modes: automatic, host, and device, used for charging and data transmission.
7.11 3G/LTE
3G/LTEThe default mode is open, used to control3G/4GIs the network card turned on.
7.12 WIFI
WIFIDefault to off state, used to control devicesWIFIIs the hotspot turned on.
The default password for device hotspot is:12345678.
7.13 GPS
GPSSet default to open state, used to turn on and off this machineGPSPositioning function.
7.14 Screen brightness
The default screen brightness is high, and different screen brightness can be set according to different situations. There are four different modes: high, medium, low, and automatic.
7.15 Automatically turn off the screen
The default for automatic screen shutdown is30second. There are closures30Seconds1minute3minute5Five states can be selected per minute.
7.16 Recording mode
The recording mode is available in manual and automatic modes, and the corresponding mode can be selected according to the situation.
7.17 Coverage mode
After setting the overwrite mode, the earliest file will be automatically overwritten when the memory is almost full, but it will not be overwrittenIMPDocument.
7.18 Infrared switching
Infrared switching is available in two modes: manual and automatic. In automatic modeequipmentIt can automatically switch modes according to the current environment.
7.19 Sensitivity of microphone
The sensitivity of the microphone can be measured from0Adjust to10The higher the sensitivity, the better the sound signal during recording.
7.20 Volume and alert sound
The speaker volume can be adjusted from0Adjust to10The default volume is9The prompt sound is turned on by default and does not include the main buttons such as recording when turned off.
7.21 Vibration prompt
The default state is open.
7.22 time synchronization
Enabling time synchronization allows device time to be synchronized through network means.
7.23 External audio
External audio is available in three modes: headphones, walkie talkie, and none, which can be selected according to the requirementsChoose the appropriate mode based on the situation.
7.24 Video segmentation
Video segmentation refers to packaging a video file with a set length of time, which defaults to5Package a video file per minute.
7.25 Video encryption
After enabling video encryption, the recorded video requires a dedicated player and password on the computer to play, with the default password888888.
7.26 Video pre recording
Video pre recording is turned off by default. There are closures5In seconds10In seconds20Four states in secondsOptionally, when this feature is enabled,equipmentAdvance the framing of the scene with
Pre stored in cache in a cyclic manner.
7.27 Video extension
Video extension has been closed5In seconds10In seconds20Four states can be selected in seconds, if setWhen set to a non closed state, pressing the stop button on the video recording device will continue recording videos within the set time.
7.28 Laser lights and language
The default state of the laser light is disabled, and it takes effect when turned on. The default language is Simplified Chinese.
7.29 password protection
After enabling password protection, you need to enter a password when entering the settings and playback interfaceRecognize password as888888.
7.30 disableUplate
The default mode is off.USBEnable and disable when connecting to a computer via cableUDisk, computer access stoppedequipmentThe storage.
7.31 Device Information
Device information includes hardware version, firmware versionMCUVersion, product serial number, manufacturer code, product model3G/LTE IPTheWIFI IPGatewayDNS0TheDNS1ServerIP(Register the server)IPAddress, server port (device upload port)3G/4GModuleIMEI, operator, signal strengthWIFIModuleWifi MACTheAPname.
Online inquiry
-
Contacts
-
Company
-
Telephone
-
Email
-
WeChat
-
Verification Code
-
Message Content
-